1.75 Lab Grown Diamond Ring: The Definitive Australian Buying Guide

Selecting a 2-carat stone for maximum impact is a common instinct, but a 1.75 lab grown diamond ring often represents the more calculated, high-performance choice for the discerning Australian buyer. You likely want a substantial visual presence that doesn't compromise the architectural stability of a minimalist setting or result in paying a premium for a weight threshold that doesn't always improve light performance. With lab-grown prices showing a modest 0.7% decrease in the 21 days leading up to April 25, 2026, the current market offers a unique window to secure a high-specification stone between AUD $2,100 and $4,375 before the setting is even considered.
We'll provide the technical data you need to master the 4Cs and understand the actual face-up dimensions of a 1.75ct stone across different shapes. You'll learn how to select a setting that ensures the security of your centre stone while maximising its optical efficiency. This guide covers everything from GIA and IGI certification standards to the structural engineering required for long-term durability, ensuring your selection is a permanent and high-performing asset that balances architectural aesthetics with engineering excellence.
Key Takeaways
- Understand why a 1.75 lab grown diamond ring provides the same visual presence as a 2-carat stone while allowing for a more focused investment in optical performance.
- Master the technical grading requirements for clarity and colour to ensure your stone remains bright and transparent in Australia's unique lighting conditions.
- Analyse the structural integrity of various settings to find the optimal balance between high-level security and a refined, architectural aesthetic.
- Compare how different diamond shapes influence the perceived face-up size and learn to detect technical imperfections like the bow-tie effect in elongated cuts.
- Learn how a bespoke approach to sourcing and setting ensures your selection meets the rigorous standards required for a permanent, high-value asset.
The 1.75-Carat Sweet Spot: Visual Impact vs. Technical Value
Choosing a 1.75 lab grown diamond ring is a decision rooted in both aesthetic ambition and technical precision. For Australian buyers, this specific weight class serves as a prestige-tier entry point that offers the visual gravity of a larger stone without the diminishing returns associated with whole-carat premiums. A 1.75ct diamond represents a sophisticated middle ground. It provides a significant face-up area that commands attention, yet it maintains a weight that doesn't compromise the structural integrity of the ring's architecture. Understanding the scientific background of lab-grown diamonds, specifically how they're grown via Chemical Vapour Deposition (CVD) or High Pressure High Temperature (HPHT), reveals that the material remains identical to natural counterparts in every physical and optical sense. The 1.75ct sweet spot is the intersection of high-tier presence and optimal light refraction.
Comparing Visual Scale: 1.75ct vs. 2.0ct
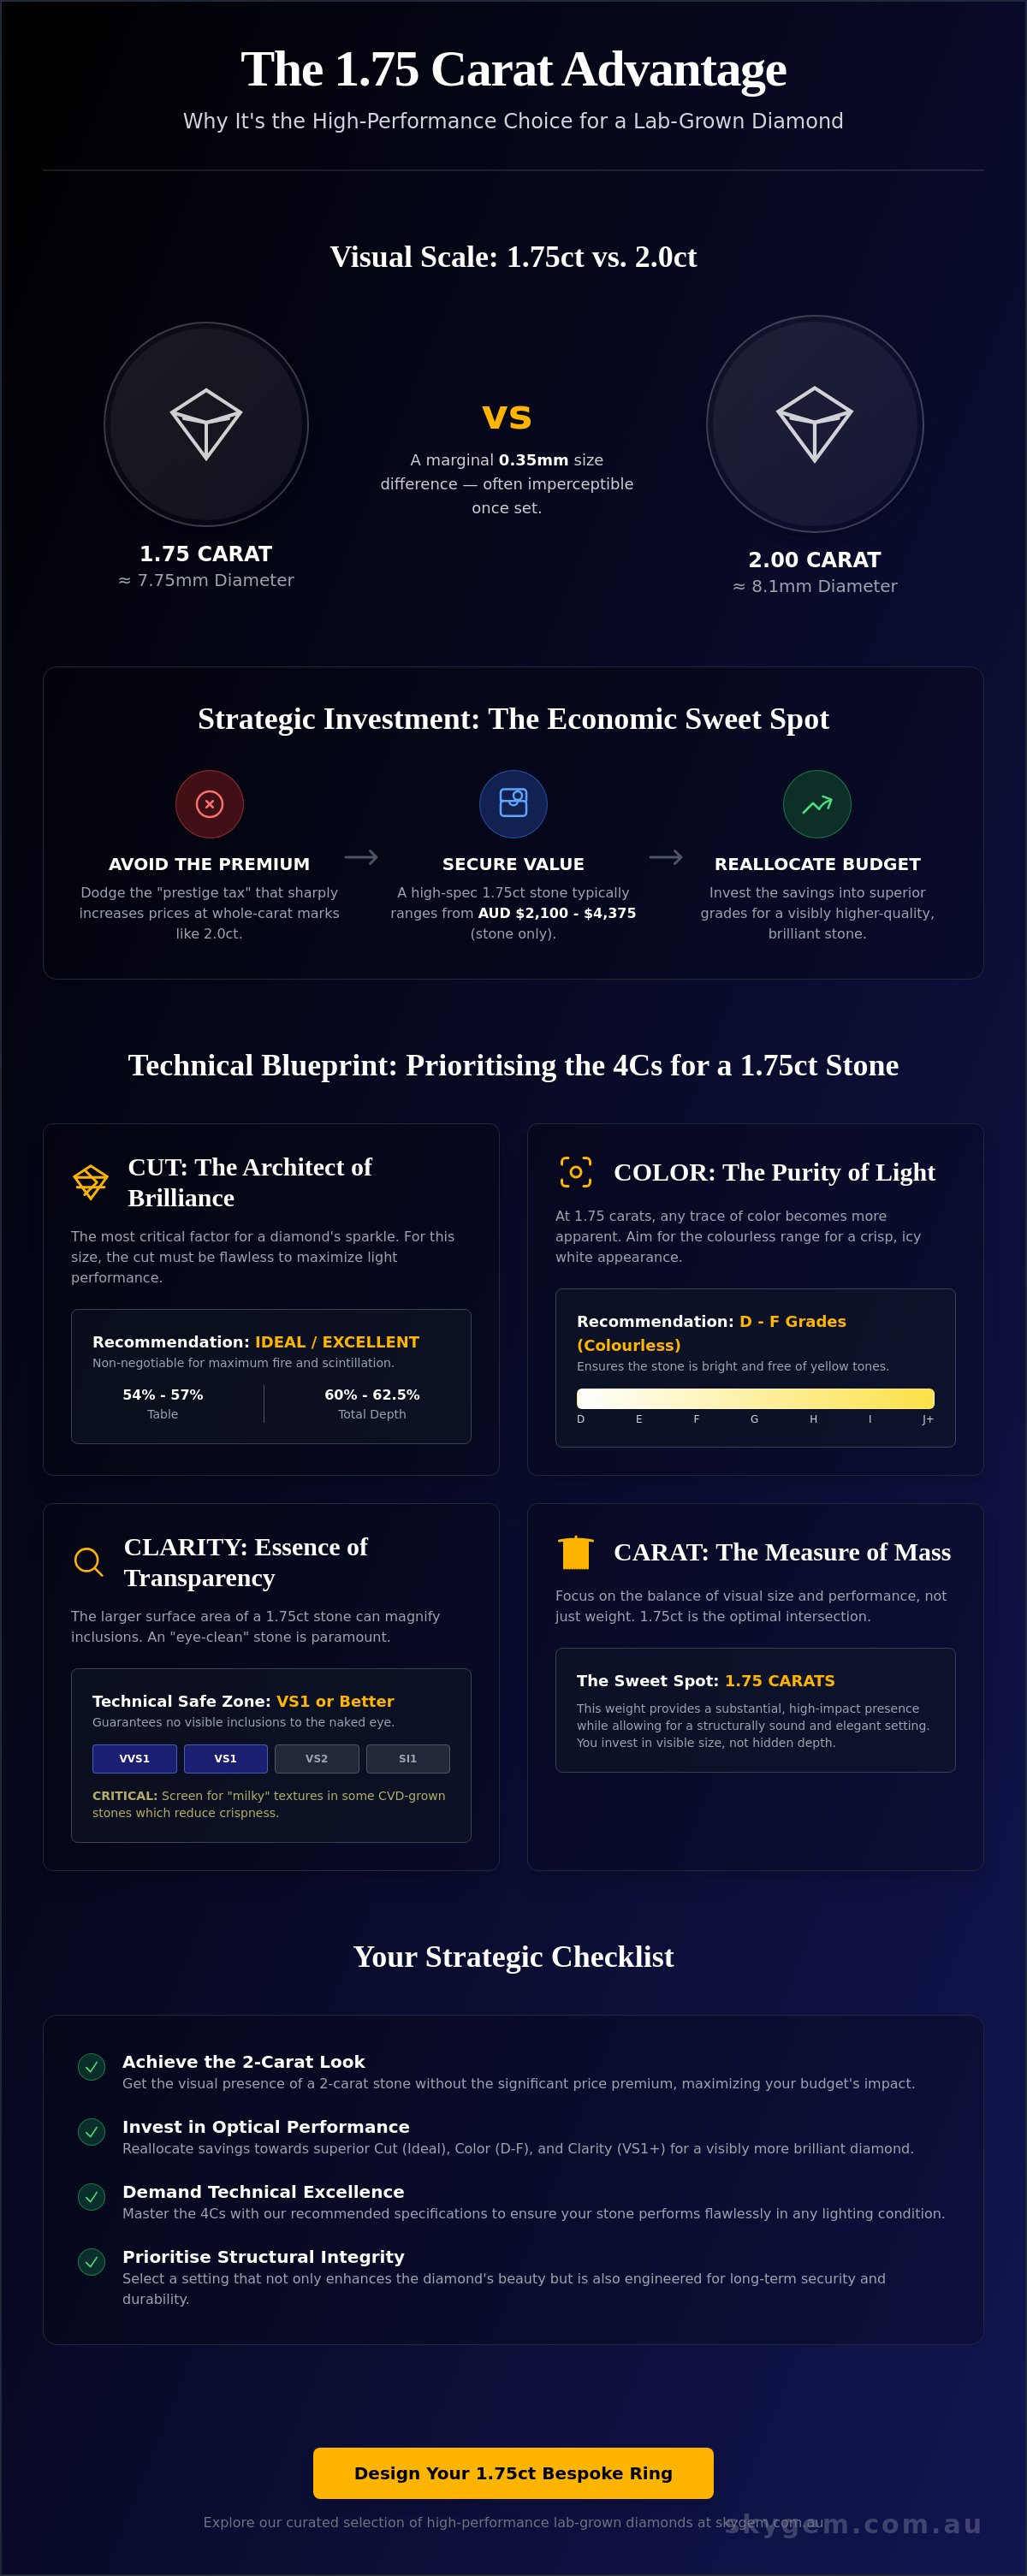
The perceived size of a diamond is dictated by its "face-up" diameter rather than its weight alone. A standard 1.75ct round brilliant diamond typically measures approximately 7.75mm in diameter. In contrast, a 2.0ct stone averages around 8.1mm. This marginal 0.35mm difference is often imperceptible to the naked eye, especially once the stone is secured in a well-engineered setting. Much of the additional 0.25 carats in a 2.0ct stone is often hidden in the depth of the pavilion, contributing to weight but not to the visible surface area. By prioritising the millimetre spread over the carat number, you ensure the stone's dimensions are utilised for maximum visual impact without unnecessary mass.
The Economic Logic of 1.75 Carats
In the Australian market, diamond pricing follows a stepped structure where costs increase sharply at whole-carat increments. By selecting a 1.75ct stone, you avoid the "prestige tax" associated with the 2.0ct mark. As of May 2026, high-quality 1.75ct lab-grown stones range between AUD $2,100 and $4,375. This price gap allows you to reallocate your budget toward superior technical specifications, such as D-F colour grades or VVS1 clarity. Investing in these higher grades ensures the diamond maintains a "colourless" profile and perfect transparency under Australia's bright natural sunlight. You can explore these specific grade combinations through our lab-grown diamond selection tool to find the exact balance for your project. This approach results in a stone that doesn't just look large, but performs with the brilliance expected of a premium, future-proof asset.
Technical Specifications: Prioritising the 4Cs for a 1.75ct Stone
A 1.75 lab grown diamond ring demands a higher level of technical scrutiny than smaller carat weights because the increased surface area acts as a magnifier for internal characteristics. While a 1.0ct stone might mask certain inclusions, the 7.75mm diameter of a 1.75ct round brilliant leaves little room for error. We prioritise Type IIa diamonds. These represent the most chemically pure form of carbon, lacking the measurable nitrogen impurities found in most natural stones. This purity results in superior thermal conductivity and optical transparency. To verify these attributes, we rely on GIA's lab-grown diamond grading reports, which provide the digital data necessary to confirm a stone's molecular integrity and growth history.
Clarity Thresholds for Larger Lab Diamonds
For a stone of this scale, VS1 clarity serves as the technical safe zone. The larger facets of a 1.75ct stone, particularly in step-cuts like emerald or asscher, make inclusions significantly more visible than in smaller variants. You should specifically look for "eye-clean" stones where inclusions are located away from the table. It's also vital to screen for "milky" textures. These occur in lower-quality CVD diamonds where the growth rate was too rapid, leading to microscopic structural defects that scatter light and reduce crispness.
Proportions and Light Performance
The brilliance of a 1.75 lab grown diamond ring is ultimately a product of its architectural proportions rather than its weight. An Ideal Cut is non-negotiable for maximising scintillation. For a round brilliant, we look for a table percentage between 54% and 57% and a total depth between 60% and 62.5%. If the stone is too shallow, light leaks through the pavilion instead of reflecting back to the eye. This makes the diamond appear smaller and darker. You can use SkyGem’s diamond consultation to verify light maps and ensure the stone achieves maximum photometric efficiency. This methodical approach ensures every facet is engineered to perform under Australia's intense natural light, maintaining a bright, colourless D-F profile.
Structural Engineering: Selecting the Right Setting
A 1.75 lab grown diamond ring isn't just a piece of jewellery; it's a structural assembly that must withstand daily mechanical stresses. The 1.75ct stone carries enough mass to create significant leverage against the band. If the setting's architecture is too fragile, the stone is susceptible to shifting or loss over time. We recommend 18K gold or Platinum for these weights. Platinum, in particular, offers superior tensile strength and doesn't thin as it wears, making it the ideal choice for high-carat centre stones. Before the setting is cast, we cross-reference the exact millimetre dimensions found in the GIA Laboratory-Grown Diamond Report to ensure the prongs are positioned for maximum grip and light entry.
The debate between 4 and 6 prongs is often framed as an aesthetic choice, but it's fundamentally an engineering one. While 4 prongs offer a minimalist, square-like look, 6 prongs provide a vital failsafe. If one prong is damaged on a 6-prong setting, the stone remains secure. For a 1.75ct stone, this redundancy is a prudent investment in future-proofing. Regular maintenance, including a professional check of the prong tension every 12 months, ensures the assembly remains as stable as the day it was commissioned.
Solitaire vs. Halo: Impact on Security and Scale
A halo setting serves as a protective perimeter. It absorbs the impact of accidental knocks that might otherwise hit the girdle of the diamond directly. However, for those seeking a minimalist solitaire, we employ a "basket" or "tulip" setting. This design adds horizontal support bars between the prongs, preventing them from spreading or bending. This level of detail is a hallmark of bespoke engagement rings, where every component is engineered for the specific stone rather than being mass-produced in a generic mould.
Band Width and Proportion
A common error in the Australian market is pairing a 1.75ct stone with an ultra-thin 1.2mm band. This creates a "top-heavy" imbalance, causing the ring to spin on the finger. We suggest a minimum band width of 1.8mm to 2.0mm. This provides the necessary surface area to stabilise the 1.75 lab grown diamond ring against the hand. Tapering the band toward the stone can create an optical illusion that makes the diamond appear larger while maintaining the structural integrity at the base of the ring. Hand-finishing the prongs ensures they're smoothed down to the stone's surface, reducing snagging on clothing and maintaining structural integrity for decades.
Shape Comparison: Maximising the Perceived Size
The geometry of a 1.75 lab grown diamond ring determines its total visual footprint on the hand. While carat weight is a measure of mass, the millimetre spread defines the face-up area that the eye actually perceives. Elongated shapes, such as the oval, pear, and marquise, utilise their volume to create a larger perceived size compared to round cuts. For instance, a 1.75ct oval typically measures approximately 9.5mm by 7.0mm. In contrast, a round brilliant of the same weight averages a diameter of 7.75mm. This geometric efficiency allows elongated cuts to cover more of the finger's width, often appearing 15% to 20% larger than their round counterparts.
Technical grading becomes more complex with these elongated forms. The "bow-tie effect" is a primary concern for 1.75ct ovals and marquise cuts. This dark shadow across the centre of the stone occurs when light passes through the pavilion facets instead of reflecting back to the table. We meticulously screen for stones where facet alignment minimises this shadow, ensuring consistent light return across the entire surface. Emerald cuts present a different challenge. Their long, open step facets act as windows into the stone's interior. For a 1.75ct emerald cut, we recommend a minimum clarity of VVS2 to ensure the architectural "hall of mirrors" effect remains undisturbed by visible inclusions.
The Oval Advantage
The 1.75ct oval is currently a top-performing trend across Australia, favoured for its ability to visually lengthen the finger. This shape provides a superior surface area per carat, making it a high-performance choice for those prioritising scale. You can explore how different shapes influence the final design in our engagement rings collection. By selecting an oval with a length-to-width ratio between 1.35 and 1.50, you achieve the optimal balance of elegance and structural stability.
The Classic Round Brilliant
The round brilliant remains the gold standard for scintillation and light performance. For a 1.75ct stone, symmetry is the most critical technical specification. Excellent symmetry ensures that every facet is a mirror image of its opposite, allowing for maximum light refraction. A well-cut 1.75ct round will often outshine a poorly cut 2.0ct stone because it eliminates light leakage at the edges. This ensures the diamond maintains its brilliance even in low-light environments, serving as a permanent and high-performing asset. Select a shape that aligns with your aesthetic and technical requirements by browsing our comprehensive engagement ring range.
The SkyGem & Co. Standard: Bespoke Craftsmanship
Creating a 1.75 lab grown diamond ring requires more than just selecting a stone; it necessitates a structural framework that matches the diamond's technical excellence. At SkyGem, we move beyond the limitations of mass-produced settings, which often use generic moulds that fail to account for the specific millimetre variances of a 1.75ct stone. Each project begins with a technical consultation where we source a stone that meets our rigorous internal criteria for photometric performance and molecular purity. Transparency remains a non-negotiable pillar of our process. We ensure every diamond is accompanied by a GIA or IGI certificate, providing a verified digital record of its growth history and grading. This methodical approach ensures that the stone's light performance isn't just a theoretical value on a report but a visible reality in daily wear.
Precision Manufacturing
Modern jewellery design relies on the intersection of engineering software and traditional bench skills. We utilise CAD (Computer-Aided Design) to create a perfectly balanced ring, ensuring the centre of gravity is low enough to prevent the stone from shifting on the finger. This architectural planning allows us to simulate the stresses on the metal before a single gram of gold is cast. Unlike cast-in-place methods where stones are set into pre-formed holes, our master jewellers hand-set every diamond. This ensures optimal prong tension and a flush fit against the girdle, which is critical for the long-term security of a 1.75ct stone. You can learn more about our engineering-led process for custom made engagement rings.
National Service and Reliability
Our partnership with clients extends well beyond the initial delivery. We provide a comprehensive suite of lifetime benefits, including professional cleaning, maintenance checks, and a lifetime warranty on manufacturing. For our Australian clients, we offer complimentary resizing to ensure the fit remains precise as environments change. This commitment to reliability is grounded in Australian-led design standards and a strict adherence to ethical sourcing. We view ourselves as technical consultants dedicated to the long-term success of your selection, ensuring your ring remains a functional and beautiful asset for decades. By choosing a bespoke solution, you're investing in a permanent asset designed to endure. Book a consultation to design your 1.75ct lab diamond ring and experience our technical approach to luxury.
Securing Your High-Performance Diamond Investment
Selecting a 1.75 lab grown diamond ring is a strategic decision that prioritises optical performance over arbitrary weight thresholds. By focusing on the millimetre spread and rigorous technical grading, you secure a stone that offers the visual impact of a larger diamond while maintaining superior light refraction. Our methodology integrates GIA and IGI certified diamonds with bespoke, hand-finished craftsmanship to ensure every setting is a structurally sound, permanent asset. We're committed to the long-term success of your project, providing a lifetime warranty and complimentary resizing for all our Australian clients.
Whether you opt for the increased surface area of an oval cut or the classic scintillation of a round brilliant, your selection should reflect a balance of architectural aesthetics and engineering precision. We invite you to move beyond mass-produced options and partner with a specialist who understands the technical nuances of high-carat lab diamonds. Explore our curated 1.75ct Lab-Grown Diamond collection to begin your design journey with confidence.
Frequently Asked Questions
How big is a 1.75-carat lab-grown diamond on a finger?
A round brilliant 1.75-carat diamond measures approximately 7.75mm in diameter, providing a substantial visual footprint. On a standard Australian size L finger, which has a width of roughly 16.3mm, the stone covers nearly 48% of the finger's surface. This creates a high-impact appearance that commands attention without overwhelming the hand's natural proportions.
Are lab-grown diamonds as durable as natural diamonds for everyday wear?
Lab-grown diamonds are identical to natural diamonds in physical and chemical composition, ranking 10 on the Mohs scale of hardness. They're the hardest known material, making them exceptionally resistant to scratching and daily wear. Because they're often Type IIa stones, they possess superior thermal conductivity and structural purity, ensuring they remain a permanent and durable asset for decades.
Does a 1.75ct lab-grown diamond come with a certificate?
Every premium 1.75 lab grown diamond ring should be accompanied by a digital grading report from a reputable laboratory like the GIA or IGI. These certificates provide an objective analysis of the stone's 4Cs and confirm its origin as lab-grown. This documentation is essential for verifying the technical specifications and ensuring you're receiving a stone that meets international quality standards.
What is the best setting for a 1.75ct lab diamond to ensure it doesn’t fall out?
A six-prong setting or a basket design with horizontal support bars offers the most secure environment for a stone of this mass. These architectural choices provide structural redundancy, which means the diamond remains held even if a single prong is accidentally damaged. This level of engineering is vital for high-carat stones to prevent shifting and ensure long-term stability.
Is there a significant price difference between 1.5ct and 1.75ct?
There is a measurable price increase between these weights because lab-grown diamond costs scale at specific quarter-carat thresholds. While a 1.5ct stone is a popular choice, the 1.75ct weight class offers a 15% increase in visible surface area. This price jump reflects the increased technical difficulty in growing larger, high-clarity crystals without internal structural defects.
Can I use a 1.75ct lab diamond in a custom-designed ring?
A 1.75ct lab diamond is an ideal candidate for bespoke design because its dimensions require a precisely engineered setting. We utilise CAD software to build a ring around the specific millimetre measurements of your stone, ensuring a flush fit and optimal balance. This custom approach prevents the "spinning" often associated with pairing large stones with generic, mass-produced bands.
How do I clean and maintain my 1.75ct lab diamond ring at home?
You can maintain the stone's brilliance by soaking it in warm water with a mild, ammonia-free detergent and gently scrubbing with a soft brush. This process removes the daily accumulation of oils and dust that can dull the diamond's light performance. It's also prudent to schedule a professional inspection every 12 months to verify the integrity of the prongs and metalwork.
Is a 1.75-carat diamond considered a "large" engagement ring?
A 1.75-carat stone is considered a prestige-tier size in the Australian market, where the average centre stone is closer to 1.0ct. It provides a visual presence that rivals a 2-carat stone while allowing for a more focused investment in cut quality and clarity. This size is widely recognised as a "large" engagement ring that offers a sophisticated and luxurious aesthetic.
Disclaimer
This article is for general informational purposes only and may include AI-assisted content. Pricing, specifications, and availability are subject to change. For accurate advice and current information, please contact SkyGem & Co. directly. Nothing in this content constitutes professional or financial advice.